Multiple MLX90614 Sensors
Nearly all articles you might look for regarding trying out an MLX90614 with an Arduino contain examples of using one sensor at a time. This makes sense as probably 99% of people are going to prototype a system with only one sensor in it. Quite a few articles make the incorrect assumption that having more than one sensor in a circuit is not even possible because the device slave addresses are hard coded. They do all come out of the factory with a default slave address of 0x5A, but this can be changed with a small amount of effort.
Now I plan to use two of these MLX90614 sensors in my cloud detection project so there was no two ways about it - I need 2 sensors, hence two slave addresses. Below I am going to take a look at the code to change the slave address on one of these devices, and then a way of actually implementing the change.
For reference purposes, I have lifted a pinout diagram of the device from the Melexis MLX90614 Datasheet, and reproduced it below:
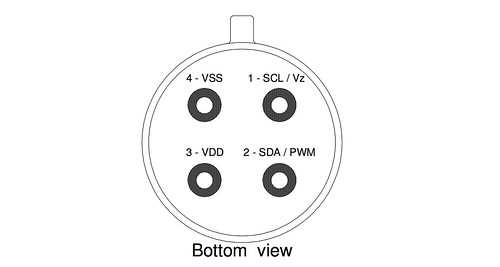
MLX90614 Pinout - courtesy of Melexis NV
Giving an MLX90614 a New Address
After some research on the net I came across this forum post which proved to be very helpful indeed. It was posted by a user called paulrd about whom I've not been able to find any other information. Owing paulrd a debt of gratitude I am reproducing the code here in a slightly modified form.
1 2 3 4 5 6 7 8 9 10 11 12 13 14 15 16 17 18 19 20 21 22 23 24 25 26 27 28 29 30 31 32 33 34 35 36 37 38 39 40 41 42 43 44 45 46 47 48 49 50 51 52 53 54 55 56 57 58 59 60 61 62 63 64 65 66 67 68 69 70 71 72 73 74 75 76 77 78 79 80 81 82 83 84 85 86 87 88 89 90 91 92 93 94 95 96 97 98 99 100 101 102 103 104 105 106 107 108 109 110 111 112 113 114 115 116 117 118 119 120 121 122 123 124 125 126 127 128 129 130 131 132 133 134 135 136 137 138 139 140 141 142 143 144 145 146 147 148 | // remap_mlx90614.ino
#include "i2cmaster.h"
// New slave address, purposefully left shifted
byte NewMLXAddr = 0x1B;
// 0x5A is the default address - uncomment this to set it back
// byte NewMLXAddr = 0x5A;
void setup(){
Serial.begin(9600);
Serial.println("Setup...");
// Initialise the i2c bus, enable pullups and then wait
i2c_init();
PORTC = (1 << PORTC4) | (1 << PORTC5);
delay(5000);
// Read current address bytes
ReadAddr(0);
// Change address to new value (NewMLXAddr);
ChangeAddr(NewMLXAddr, 0x00);
// Read address bytes
ReadAddr(0);
Serial.print("> Cycle power NOW to set address to: ");
Serial.print(NewMLXAddr, HEX);
Serial.println(" - you have 10 seconds");
// Cycle power to MLX during this 10 second pause
delay(10000);
// Read temperature using default address
ReadTemp(0);
// Read temperature using new address (note left bit shift for reading)
ReadTemp(NewMLXAddr<<1);
Serial.println("**---DONE---**");
}
void loop(){
delay(5000);
ReadTemp(NewMLXAddr<<1);
}
word ChangeAddr(byte NewAddr1, byte NewAddr2) {
Serial.println("> Change address");
// Send start condition and write bit
i2c_start_wait(0 + I2C_WRITE);
// Send command for device to return address
i2c_write(0x2E);
// Send low byte zero to erase
i2c_write(0x00);
// Send high byte zero to erase
i2c_write(0x00);
if (i2c_write(0x6F) == 0) {
// Release bus, end transaction
i2c_stop();
Serial.println("> Data erased.");
}
else {
// Release bus, end transaction
i2c_stop();
Serial.println("> Failed to erase data");
return -1;
}
Serial.print("> Writing data: ");
Serial.print(NewAddr1, HEX);
Serial.print(", ");
Serial.println(NewAddr2, HEX);
for (int a = 0; a != 256; a++) {
// Send start condition and write bit
i2c_start_wait(0 + I2C_WRITE);
// Send command for device to return address
i2c_write(0x2E);
// Send low byte zero to erase
i2c_write(NewAddr1);
// Send high byte zero to erase
i2c_write(NewAddr2);
if (i2c_write(a) == 0) {
// Release bus, end transaction then wait 10ms
i2c_stop();
delay(100);
Serial.print("> Found correct CRC: 0x");
Serial.println(a, HEX);
return a;
}
}
// Release bus, end transaction
i2c_stop();
Serial.println("> Correct CRC not found");
return -1;
}
void ReadAddr(byte Address) {
Serial.println("> Read address");
// Inform the user
Serial.print(" MLX address: ");
Serial.print(Address, HEX);
Serial.print(", Data: ");
// Send start condition and write bit
i2c_start_wait(Address + I2C_WRITE);
// Send command for device to return address
i2c_write(0x2E);
i2c_rep_start(Address + I2C_READ);
// Read 1 byte and then send ack (x2)
Serial.print(i2c_readAck(), HEX);
Serial.print(", ");
Serial.print(i2c_readAck(), HEX);
Serial.print(", ");
Serial.println(i2c_readNak(), HEX);
i2c_stop();
}
float ReadTemp(byte Address) {
int data_low = 0;
int data_high = 0;
int pec = 0;
Serial.println("> Read temperature");
// Inform the user
Serial.print(" MLX address: ");
Serial.print(Address, HEX);
Serial.print(", ");
i2c_start_wait(Address + I2C_WRITE);
// Address of temp bytes
i2c_write(0x07);
// Read - the famous repeat start
i2c_rep_start(Address + I2C_READ);
// Read 1 byte and then send ack (x2)
data_low = i2c_readAck();
data_high = i2c_readAck();
pec = i2c_readNak();
i2c_stop();
// This converts high and low bytes together and processes the temperature
// MSB is a error bit and is ignored for temperatures
// Zero out the data
float temp = 0x0000;
// This masks off the error bit of the high byte, then moves it left
// 8 bits and adds the low byte.
temp = (float)(((data_high & 0x007F) << 8) + data_low);
temp = (temp * 0.02) - 273.16;
Serial.print(temp);
Serial.println(" C");
return temp;
}
|
When it comes to choosing a new address for your sensors, you will find that you have quite a wide selection of possibilities. The Melexis MLX90614 Datasheet states that "the SA feature allows connecting up to 127 devices (SA=0x00...0x07F) with only 2 wires". I have experimented with a number of different addresses between 0x00 and 0x07F without a single problem. Just be aware that most libraries for Arduino refer to the factory default address of 0x5A.
Running the Code
The first thing to do is to connect the Arduino and MLX90614 in a circuit, such as in the picture below. I won't go to any lengths to explain it [1]. Please note that pin 1 on the device (SCL) leads to A5 on the Arduino; pin 2 (SDA) leads to A4 on the Arduino - I have made the mistake of mixing these two up more than once. Other than the preceding point, the layout is standard for such devices and there are many other places on the net which will extemporise on these matters.
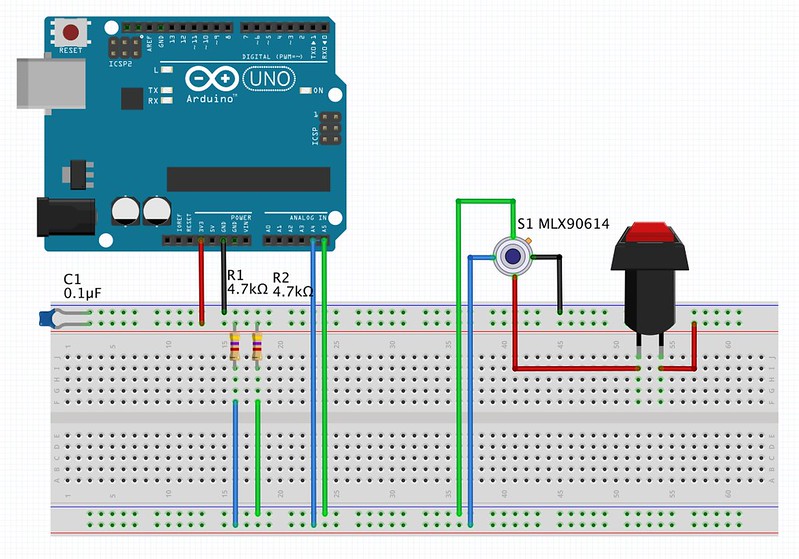
An Arduino and MLX90614 with NC switch on the supply
The only thing of note is that during the program run you will have to recycle the supply voltage to the MLX90614. Some people (like me) just pull out and then push back in a wire in the breadboard; others with more time to spend put an NC push switch on the supply to the sensor - as pictured above. Do whatever you feel is necessary to get the job done.
Warning
One note of caution - when attempting to change addresses do not have more than one MLX90614 on the circuit at the same time.
Next, upload the program above to your Arduino and run it, being ready to pounce with that wire or push switch during the 10 second pause.
Here's what my output looked like when changing the address of a device from 0x2A to 0x2B:
Setup...
> Read address
  MLX address: 0, Data: 2A, 0, 4D
> Change address
> Data erased.
> Writing data: 2B, 0
> Found correct CRC: 0x56
> Read address
  MLX address: 0, Data: 2B, 0, 0
> Cycle power NOW - you have 10 seconds
> Read temperature
  MLX address: 0, 21.36 C
> Read temperature
  MLX address: 56, 21.36 C
**---DONE---**
> Read temperature
  MLX address: 56, 21.26 C
> Read temperature
  MLX address: 56, 28.90 C
> Read temperature
  MLX address: 56, 21.04 C
One last item to note is that if at some point you end up with a pile of these sensors whose addresses you have forgotten because you changed them and did not note it anywhere, do not panic. The universal address (0) will allow you to access the individual device in order to change the slave address again or whatever.
| [1] | Except for the following addendum! |
Comments
comments powered by Disqus